Tuesday, February 24, 2009

Level Cake Assembly 101


Now, don't get me wrong, I like a crooked cake just as much as you do. I like how how cute and homemade looking they are....but there's nothing more annoying than a crooked cake when you're attempting to build a level cake. Plus, it's pretty important to have level cakes when you start stacking them on top of each other.


To reduce cake waste (unless you're like me, and want some cake waste so you can eat it), you can invest in some Bake Even Strips that Wilton makes. You just dampen them and wrap 'em around the cake pans before they go into the oven. Of course, if you have some old dish towels around and, if they are long enough, you can make some homemade strips by cutting, folding, dampening and wrapping them around the cake pans.

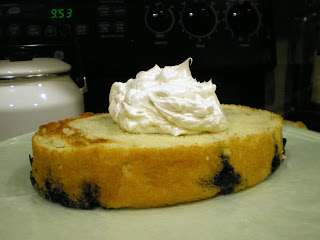
After the cakes have cooled, they can be leveled. Professional bakers use a bread knife and just go for it. Lazy, yet smart, bakers (such as myself) use a leveling tool. Again, Wilton makes a couple models and I have one pictured in the background of one of the pictures above. Once your cakes are leveled, you can place them on your board (or plate or cake stand with some wax paper underneath for easy clean up) and begin icing.

I like to plop lots of icing onto the cake layers and spread it over the sides. That of course is if my filling is the same as the outside icing. If they are different, you'll want to put some of your buttercream (or whatever you're icing the outside of the cake with) into a piping bag with a #12 tip and pipe around the edge of the cake and then spread your filling. But, as I was saying, if the filling and the icing are the same, let it spill over the edges.

Icing the sides of a cake can be tricky. This is where the consistency of your icing really matters. If it's too stiff or to still too chilly, then it won't spread easily. At the same time, I've tried icing a cake with a chocolate ganache that wasn't chilly enough and that was another big mess. Still, there is a little bit of technique that's involved and that comes with practice.

To start, just put a big glob of icing on the tip of your icing knife (is it called a knife? I can't remember what it's really called right now) and with slight back and forth movements (it's all in the wrist) just nudge the icing around. It's easier to start at the top where your icing is already spilling over the edges because then it will stick and hold to your cake more firmly than if you are to start at the bottom. As you add more icing it become easier to push around.

You'll also want to make sure that you build a crown around the top of cake as you ice around it. This way, when you're done you can take the edge of your knife and push the crowned icing toward the middle to get a nice smooth finish. Some bakers will even use a putty knife (you can get these at any hardware store) to run along the side of the cake to make the sides perfectly smooth. I have yet to try this technique, but I think I will soon.

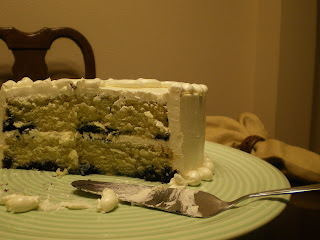
I used the extra icing to pipe a shell type border with a #10 round tip.

Monday, February 23, 2009

Blueberry Vanilla Cake with Swiss Meringue Buttercream

This week was my wonderful mother's birthday. (I think she turned like 30 or something...) So to celebrate, Husband and I invited my parents over for dinner and I made a little cake for her birthday - a little one because that's all the time and energy I had for making a cake, and little because she would have complained even more about unwanted calories when it came time for her to take the cake home.

This was also an experiment with Swiss Meringue Buttercream. I ran across a recipe when I was practicing my work avoidance techniques. I've never heard of Swiss Meringue Buttercream and since the recipe only has about four ingredients (of which I keep in stock in my kitchen) I knew mom's birthday was THE perfect opportunity to give this a try.


Let me tell you...this stuff is DIVINE! When I was piping just a few decorations onto the birthday girl's cake, I turned to Husband and said, "I could squeeze this stuff out of the piping bag and into my mouth." And I don't even like icing. So that should tell you the Yum Factor for this stuff.

The cake was good too...except I will need to play around with recipe some more. I prefer a cake that uses oil instead of butter as the fat because oil helps keep a cake more moist than butter. This particular cake is SUPER MOIST, but I decided that vanilla was just too plain-Jane and added some blueberries to give it some dimension in flavor, and the berries fell to the bottom of the cakes. It cut really pretty and still tasted like a blueberry muffin (go figure...) but I wanted the berries to float. I think this cake batter was just too runny...so this recipe will be experimented with until it reaches perfection.

Blueberry Vanilla Cake:

2 1/4 cups all-purpose flour
1 2/3 cups sugar
3 1/2 teaspoons baking powder
1 teaspoon salt
1 1/4 cups milk
2/3 cup oil (or butter if you prefer)
1 teaspoon vanilla extract
3 eggs
1 1/2 - 2 cups fresh or frozen blueberries

1) Preheat oven to 350 degrees F. Grease and flour two round 8" cake pans (I use Baker's Joy because I'm lazy).

2) Put all the ingredients in a mixing bowl (I put the dry ingredients in first, and then added the wet ingredients on the top). Mix on medium speed for 2 - 3 minutes.

3) Pour batter into cake pans and bake for 25 - 35 minutes. Cake is ready when a cake tester (or a toothpick) comes out clean.

Swiss Meringue Buttercream:

Recipe makes enough for the 8" cake above, plus a little extra for simple decorations.

1 cup granulated sugar
4 large egg whites
26 tablespoons unsalted butter, softened (3 sticks plus 2 tablespoons)
1 teaspoon vanilla extract

1) Place the egg whites and sugar in a mixing bowl (if you have a KitchenAid stand mixer, use that bowl) and place bowl over a pot of simmering water. Whisk constantly until the temperature reaches 140 degrees F on a thermometer. I used an instant read thermometer, but I'm almost positive a candy thermometer is probably the better choice. The heating process will take approximately 3 - 5 minutes.

2) Once the mixer reaches 140 degrees F, take the bowl off of the simmering pot of water, quickly wipe the moisture off the bottom of the bowl (will be on the outside of the bowl...this is an important step), place on the stand mixer, hook up the whisk attachment, and beat on the HIGHEST speed. Then step back and marvel at how quickly you did all of that.

3) While this is mixing, take an opportunity to cut your softened butter into pieces (1 - 2 tablespoons in size).

4) Check that the sugar and egg white mixture is cool before adding the butter. You can check this by placing the inside of your wrist on the outside of the bowl (mixture takes about 8 - 10 minutes to cool). When the bowl is cool to the touch (not warm, but cool) then you can now start adding the butter.

5) Turn the mixer speed down to just above the "stir" speed and SLOWLY add the butter. I added the next peice after seeing that the previous piece had been completely incorporated.

6) As you add the butter, the mixture will begin to thicken and starts to look like it's curddling and is going to be ruined. Just keep beating on that low speed until it reaches the proper consistency. Which means that it's beautiful and creamy. I think it looked like stiff peak whipping cream....maybe a little more sturdy looking than that. But I think you get the idea.

7) Once the proper consistency is reached, you can add any additional flavourings. This is when you will add the vanilla extract. After you do, it start to looks like it's going to curddle again....just keep beating on low until it goes back to the proper consistency.

This stuff is something else, I'm going to have to experiment a little with the whole "add any additional flavourings" bit. I just like a little more direction than that...

By the way, this stuff can be stored in your refrigerator. When you need to use it, let it come to room temperature and beat it in your mixer to get it to the proper consistency. Or you could just make it when you need it to avoid cleaning out the mixing bowl twice for the same batch of buttercream!

I think we'll assemble this cake in another post....

Saturday, February 21, 2009

The Maiden Posting

Dun dun dun...

I hope that I'm not getting myself in too deep by starting this blog. I have two favorite things I like to do when I'm bored: eat and bake. Often, I do these things at the same time (just one example of my amazing multi-tasking skills). What I'm hoping to create is a comprehensive guide to cake making. I'm always looking for new recipes, new techniques, new products - but only when I have reason to look for these things. I enjoy cake making from start to finish, but what I live for is seeing others enjoy what I've made. I'm by no means a professional (however much I hope to become one), but I do think that I have some knowledge and tips that can be passed along...and I also hope to pick up some more knowledge and tips along the way.

I will post more later because I need to spend more time trying to figure out how this new-fangled blogging thing works and when I do, I suppose we can start from the beginning...how to assemble a level cake! Yay! (I know you're itching with excitement)